Could this be the start if Sluggy II?
Moderators: Dan J, Diesel Dave, Crazymanneil, Stuart
- Diesel Dave
- Site Admin
- Posts: 1016
- Joined: Sat Dec 02, 2006 1:21 am
- Location: Essex, UK
- Contact:
Could this be the start if Sluggy II?
Sometimes things have a habit of turning up when you least expect.
How about a complete Royal Enfield rolling chassis with V5 for less than 100 quid.
Ok it’s missing the gearbox contents, clutch and primary drive but I have those ‘in stock’ anyway. It’s an early 1990’s version so the engines blow up within very few miles - just what’s needed for a diesel conversion. It also has the early Brembo copy disk brake too so the metal shrouds on the forks can be retained. It’s even got a nice registration number K500ENF
So if Alex can stop hoovering up all the Axiam Kubota motors in the south east we may stand a chance of building Sluggy II
- Tetronator
- I luv the smell of Diesel...
- Posts: 502
- Joined: Mon Apr 07, 2014 11:50 am
- Location: Amsterdam
- Contact:
Re: Could this be the start if Sluggy II?
There's plenty of Kubotas in the NL still. Best of luck.
- Diesel Dave
- Site Admin
- Posts: 1016
- Joined: Sat Dec 02, 2006 1:21 am
- Location: Essex, UK
- Contact:
Re: Could this be the start if Sluggy II?
I did mean Alex in London rather than Alex the mad Dutchman.
So after a bit of searching and parting with hard earned cash..we have...
Stripping off the 'outer parts' reveals how narrow the actual crankcase is....7" wide at the crank position
OK so that crank centre line should be inline with the gearbox shaft but I don't have a motor jack (yet), then there is the matter of making up some mounting plates, and a primary drive but that's all merely 'work to do'.
-
- I luv the smell of Diesel...
- Posts: 319
- Joined: Mon Mar 19, 2007 9:04 am
- Location: Manchester, NW England, UK
Re: Could this be the start if Sluggy II?
So that's a Z482? My Polish mate's Guzzi V50 goes very well with one of those in it.
- Diesel Dave
- Site Admin
- Posts: 1016
- Joined: Sat Dec 02, 2006 1:21 am
- Location: Essex, UK
- Contact:
Re: Could this be the start if Sluggy II?
So here is the motor jacked up into position, this is slightly high (note the crank centre is higher than the gearbox mainshaft). This is to see if it could be installed without modifying the frame downtube.
Installed this way it does actually clear the starter motor
And the fuel pump does clear the gearbox too (although it doesn’t look like it in this shot.
However the centre distance is much shorter than the original Enfield setup with the petrol motor so it will need a shorter primary chain or belt.
So I’m thinking that a simple grinder slit or 2 in the front downtube and a stitch weld would allow the motor to sit much further forwards and could possibly maintain the original centre distance.
BTW the crank adapter to provide a 30mm key way shaft in place of that original 1:5 taper for the Aixam CVT pulley costs a whopping £150.... That’s more than I paid for the bike!
-
- I luv the smell of Diesel...
- Posts: 778
- Joined: Wed Dec 05, 2007 6:56 pm
- Location: Goshen, IN USA
Re: Could this be the start if Sluggy II?
-
Could you move it far enough forward if the starter weren't present? If so, could the starter be repositioned further down and out of the way of the downtube? You have other options for the oil filter as well if that's complicating the picture.
Also, have you considered Dieselbikin's sprocket/keyed shaft solution to the stub shaft cost? See his posts below.
https://www.dieselbikeforum.com/view ... haft#p7023
https://www.dieselbikeforum.com/view ... 98d#p16776 (scroll down the page)
Ron
- Diesel Dave
- Site Admin
- Posts: 1016
- Joined: Sat Dec 02, 2006 1:21 am
- Location: Essex, UK
- Contact:
Re: Could this be the start if Sluggy II?
That’s given me a great idea, I’ll just bolt the sprocket to the flywheel using the existing flywheel bolts.
Now if only I could find the PCD.....
-
- I luv the smell of Diesel...
- Posts: 319
- Joined: Mon Mar 19, 2007 9:04 am
- Location: Manchester, NW England, UK
Re: Could this be the start if Sluggy II?
Turn the tapered part down to the largest cylinder you can get away with and then press-fit a plain shaft over it, to size? Weld it though a hole, or pin it, to withstand the mighty torque... At least it would all stay true.
- Diesel Dave
- Site Admin
- Posts: 1016
- Joined: Sat Dec 02, 2006 1:21 am
- Location: Essex, UK
- Contact:
Re: Could this be the start if Sluggy II?
Nice idea but that taper adapter for the CVT is awfully flimsy and I wouldn’t trust it.
So long as I can drill the holes accurately for the flywheel bolts it should be fine. I can turn up an alignment piece for the spigot hole in the flywheel to meet the pilot hole in the sprocket.
It will also get the engine as far left as possible as the chain should clear the flywheel by just a few mm. It means I won’t have a huge range of adjustment for chainline so I’ll have to be extra accurate with the engine mountings- especially the rear one that mates the motor to the gearbox. The standard bolt heads won’t clear the chain so they will need to be cap heads, I think they are M10x1.25 so I’ll need some high tensile versions.
-
- I luv the smell of Diesel...
- Posts: 129
- Joined: Fri Oct 12, 2012 9:04 am
- Location: scotland uk
Re: Could this be the start if Sluggy II?
Would it not be better to space the sprocket out a few mm to clear the bolt heads ?
- Diesel Dave
- Site Admin
- Posts: 1016
- Joined: Sat Dec 02, 2006 1:21 am
- Location: Essex, UK
- Contact:
Re: Could this be the start if Sluggy II?
Not really - all will be clearer once I've got the sprocket in place and take a photo.
Essentially the flywheel mounting bolts will be replaced by longer versions that will hold the sprocket and flywheel to the crankshaft (the sprocket being drilled like the flywheel). As the chain wraps around the sprocket it would hit the std flanged bolt heads but should run clear of cap heads.
- Diesel Dave
- Site Admin
- Posts: 1016
- Joined: Sat Dec 02, 2006 1:21 am
- Location: Essex, UK
- Contact:
Re: Could this be the start if Sluggy II?
So, I have swapped the British gearbox for an Indian one as the Brit version was from an Enfield twin and as such had a slightly longer input shaft. My intention is to show this conversion as a straightforward (and cheap) way to convert a cheap Indian donor bike.
So the Indian gearbox is installed and I threw on a clutch and primary chain just to see how it will look.
-
- I luv the smell of Diesel...
- Posts: 778
- Joined: Wed Dec 05, 2007 6:56 pm
- Location: Goshen, IN USA
Re: Could this be the start if Sluggy II?
-
Looking good Dave. And yes, do generate patterns for that conversion. You'd have the honor of being the first, and perhaps only entry into the "YOUR DIESEL MOTORCYCLE BUILD PLANS" section of Dieselbike.net.
-
Looking good Dave. And yes, do generate patterns for that conversion. You'd have the honor of being the first, and perhaps only entry into the "YOUR DIESEL MOTORCYCLE BUILD PLANS" section of Dieselbike.net.
-
Ron
- Diesel Dave
- Site Admin
- Posts: 1016
- Joined: Sat Dec 02, 2006 1:21 am
- Location: Essex, UK
- Contact:
Re: Could this be the start if Sluggy II?
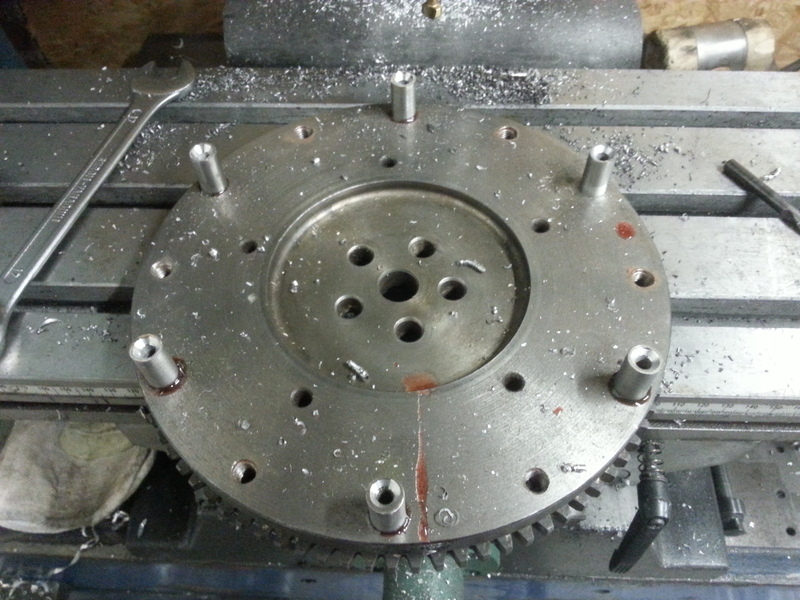
Ok so today the post delivered a few parts, mainly a new sprocket (25t Duplex) with just a pilot hole in the centre - 10 quid including delivery.
Also a small piece if 16mm mild steel - this is a very fortunate size..all will be revealed.
So we have a sprocket a flywheel and a bar of 16mm bright mild steel.
Luckily the hole in the flywheel and the pilot bore of the sprocket are both 16mm (sometimes things do work out!
So you can saw off a small piece and use it as an alignment spigot between the flywheel and the sprocket (doesn't have to be pretty just a hacksaw cut will do).
Also if you have the original taper fitting from the Aixam, it's spigot will fit into the sprocket hole so you can mark off the drill centres for the sprocket.
If you look carefully you can see the dots.
After drilling the sprocket (needs to be at least a pillar drill to get them vertical and they need to be as accurate as you can get them, clearance size for the M10x1.25 Hi Tensile bolts that will be used to secure the whole lot so thats 10.5mm)
So here is the sprocket and flywheel loosely installed as I only have a small bit of M10x1.25 studding available (still awaiting the bolts to arrive). The small piece of 16mm bar stock is in the centre and this aligns the sprocket with the flywheel (not the bolts)
So now you can see why cap heads are needed as std 13mm hex heads would clash with the primary chain.
More to follow
- Diesel Dave
- Site Admin
- Posts: 1016
- Joined: Sat Dec 02, 2006 1:21 am
- Location: Essex, UK
- Contact:
Re: Could this be the start if Sluggy II?
So this is how the primary will look when the longer bolts arrive and it does look like the 12mm flanged he'd heads would clear the primary chain when it wraps around the primary sprocket.
- Tetronator
- I luv the smell of Diesel...
- Posts: 502
- Joined: Mon Apr 07, 2014 11:50 am
- Location: Amsterdam
- Contact:
Re: Could this be the start if Sluggy II?
Nice job so far Dave. You can machine off most of the flywheel surface to get rid of some weight and gain extra clearance.
Make sure not to hit the balancing holes tough.
Like I've done on my build.
Make sure not to hit the balancing holes tough.
Like I've done on my build.
- Diesel Dave
- Site Admin
- Posts: 1016
- Joined: Sat Dec 02, 2006 1:21 am
- Location: Essex, UK
- Contact:
Re: Could this be the start if Sluggy II?
Certainly, but....
My intention is to use the minimum of machine tools so it can be replicated by someone with minimum facilities.
So far all that has been required is a hacksaw, grinder and a pillar drill along with the usual spanner’s screwdrivers and sockets. The motor is supported on a wooden home made box and the bike is supported on a pair of axle stands I bought at a boot sale 10 years ago.
The only specialist tools you would need is an Enfield clutch puller.
You will have to forgive the hydraulic lift bench but a few crushed vertebrae dictate no more working at floor level.
-
- I luv the smell of Diesel...
- Posts: 517
- Joined: Sun Dec 10, 2006 8:35 pm
- Location: STAFFORDSHIRE ENGLAND
Re: Could this be the start if Sluggy II?
Just a word of warning , The Yam I built with the 750 ruggerini and the bsa gearbox was initially linked with a big chain admittedly not a duplex but it was a big one. The chain grew 6" in 500 miles. So experiment with the chain ratios but I would put money on you will have to change to belt or belts.
Sam
- Diesel Dave
- Site Admin
- Posts: 1016
- Joined: Sat Dec 02, 2006 1:21 am
- Location: Essex, UK
- Contact:
Re: Could this be the start if Sluggy II?
Hi Sam, and thanks for the warning.
The duplex primary is the original Enfield version, I usually get around 80,000 from them on the 400cc single so I’m hoping the 500 twin (being only 250cc pulses each cylinder). After the first chain wore out I switched to a Cush drive clutch and this seems to make the rear drive chain last longer despite there being Cush rubbers in the rear hub.
When you used a chain on the VFR, was there a driveline shock absorber anywhere in the system?
I would like a belt drive clutch at some point in the future but at over 500 quid; it doesn’t quite fit into the ethos of a cheap conversion.
- Diesel Dave
- Site Admin
- Posts: 1016
- Joined: Sat Dec 02, 2006 1:21 am
- Location: Essex, UK
- Contact:
Re: Could this be the start if Sluggy II?
Not much progress to report as I’m busy prepping for the grand euro tour.
Still, I have finalised the sprocket to flywheel connections with high tensile cap head bolts. The holes in the sprocket are not evenly spaced and I suspect this is to ensure the flywheel is mounted correctly so it can only be mounted one way on the crank. Despite my best efforts I did have to relieve the holes to 10.2mm before I can get a fit.
You can see how close the chain fits against the flywheel, just about perfect.
Now for the engine to gearbox connection. I bought a 500mm length of 150mm x 5mm thick steel (not long enough), this will be sufficient for the rear mount, you can see the gearbox plate bolted up in the first picture above, there is a similar plate against the engine.
I will make up the linking plates from a cardboard template, these will be welded to the gearbox plate first and then when assembled into place and I’m happy with the chain tension and horizontal alignment I’ll tack to the gearbox plate before removing and welding fully.
-
- I luv the smell of Diesel...
- Posts: 319
- Joined: Mon Mar 19, 2007 9:04 am
- Location: Manchester, NW England, UK
Re: Could this be the start if Sluggy II?
That's the only kind of CAD I'm into - Cornflakes-box Aided Design
I'm enjoying your thread. I'm jealous, really - I think you're exploring a really interesting balance of power, availability and cheapness of ingredients (and weight!). I'm keen to see how it comes out.
- Diesel Dave
- Site Admin
- Posts: 1016
- Joined: Sat Dec 02, 2006 1:21 am
- Location: Essex, UK
- Contact:
Re: Could this be the start if Sluggy II?
A little more progress from yesterday and today.
I’ve cut out the linking plates as laid out in the previous photo. Using the welding magnet to hold it in position it looks like this.
I had left them oversize to allow careful reduction to create the correct initial chain tension; when I mocked it up with the cardboard I had a mental number of 85mm on my head as the dimension between the engine and gearbox plates - final measurement turned out to be 86mm so not too far out.
So tack them in position on the smaller engine plate first
Once tacked return it to the engine so the gearbox plate position can be marked. It’s necessary to take much care to ensure the clutch and flywheel align correctly for both vertical alignment and “in and out” alignment. Accuracy here will mean the difference between a primary chain lasting 2000 miles or 200,000 miles. I used a digital protractor app on the iPhone as it was free and zeroed against the clutch vertically and then shimmed the engine to match.
So we end up with .....pause for drum roll.
Ta da!
-
- I luv the smell of Diesel...
- Posts: 517
- Joined: Sun Dec 10, 2006 8:35 pm
- Location: STAFFORDSHIRE ENGLAND
Re: Could this be the start if Sluggy II?
Dave when you say your getting 80000 out of a primary chain isn't that in an oil bath? To answer your question there was only a cush drive in the back wheel. it was an XJ. Its the un oiled that throws alarms, also the firing order and if the bangs correspond with a certain chain position.
Sam
- Diesel Dave
- Site Admin
- Posts: 1016
- Joined: Sat Dec 02, 2006 1:21 am
- Location: Essex, UK
- Contact:
Re: Could this be the start if Sluggy II?
Perfectly correct Sam.
Knowing that I can’t oil bath this one it’s going to have a drip feed system, one line to the clutch bearing and another to the old ‘paintbrush with a hole drilled through’ chain wiper.
I have no doubt it won’t last too long but at least Indian Enfield parts are cheap and available.
Knowing that I can’t oil bath this one it’s going to have a drip feed system, one line to the clutch bearing and another to the old ‘paintbrush with a hole drilled through’ chain wiper.
I have no doubt it won’t last too long but at least Indian Enfield parts are cheap and available.
-
- I luv the smell of Diesel...
- Posts: 778
- Joined: Wed Dec 05, 2007 6:56 pm
- Location: Goshen, IN USA
Re: Could this be the start if Sluggy II?
-
They're certainly my preferred form of lubrication on final drives.Knowing that I can’t oil bath this one it’s going to have a drip feed system, one line to the clutch bearing and another to the old ‘paintbrush with a hole drilled through’ chain wiper
Ron
-
- I luv the smell of Diesel...
- Posts: 778
- Joined: Wed Dec 05, 2007 6:56 pm
- Location: Goshen, IN USA
Re: Could this be the start if Sluggy II?
-
The other option for avoiding the whole primary drive lubrication challenge is to convert to belt drive. Below is the link we addressed here some years ago. And while this one couples a Yanclone to an Enfield box, it would differ little from a Kubota, albeit a bit more expensive than the chain drive. But, it would avoid all the messiness of an oil splashed primary. It does however apparently require an outrigger bearing and perhaps an extended Enfield mainshaft. Admittedly, my German's a bit rusty.
https://mz-forum.com/viewtopic.php?f=60 ... 4&start=50 (well down the page)
Ron
- Diesel Dave
- Site Admin
- Posts: 1016
- Joined: Sat Dec 02, 2006 1:21 am
- Location: Essex, UK
- Contact:
Re: Could this be the start if Sluggy II?
I have little progress to report; a combination of rolling around Europe on the original Sluggy and a lot of head scratching around the front engine mounting has combined to delay progress.
So after much internal deliberation I have decided to dangle the front of the motor from an upper engine block position as this leaves the front wheel clearance almost ‘factory’.
It’s a lot of ‘pfaffing about’ to,gat all the parts to align as it uses extended high tensile M6 bolts off the Right side and 2 of the M8 unused side engine mounting threaded holes, also my welding is not the greatest so I'll gloss over those bits.
- coachgeo
- I luv the smell of Diesel...
- Posts: 2002
- Joined: Sun Feb 22, 2009 6:00 am
- Location: USA Ohio, Above Cincinnati, Close to Dayton
Re: Could this be the start if Sluggy II?
so you have gone to a "block/chassis" configuration?? as in the engine block is now a structural part of the bike chassis with it bolted between frame members ? or is there a basket still there for engine to sit on independently and just can't see it in pic?
Devil's advocate.. .... but way this thread has evolved... should not this thread be in the bike build forum?
- Diesel Dave
- Site Admin
- Posts: 1016
- Joined: Sat Dec 02, 2006 1:21 am
- Location: Essex, UK
- Contact:
Re: Could this be the start if Sluggy II?
Coach, you are perfectly correct on both counts.
The engine is a stressed member so forms the lower part of the frame, not dangling from the head though as I thought this would not be a good engineering solution but through the cast iron block.
I should really move this to a build section of the forum, ill prob. wait till it’s complete then tidy up the postings into a more ‘followable’ format should anyone dare to emulate.
The new bike will be on display tomorrow as a work in progress a a local bike show..
- coachgeo
- I luv the smell of Diesel...
- Posts: 2002
- Joined: Sun Feb 22, 2009 6:00 am
- Location: USA Ohio, Above Cincinnati, Close to Dayton
Re: Could this be the start if Sluggy II?
Seen this done with Tiger's though it was factory that way anyway..... had not seen it done with an Enfield, but with that Kubota cast iron block.... why the heck not.. On my tiger decided to sit in a basket creating more frame so could isolate the engine/drivetrain from the chassis with appropriate anti-vibration mounts. Granted your getting yours done and mine has been on slow burn for a decade lol.Diesel Dave wrote:Coach, you are perfectly correct on both counts.
The engine is a stressed member so forms the lower part of the frame, not dangling from the head though as I thought this would not be a good engineering solution but through the cast iron block.
makes total sinceDiesel Dave wrote:I should really move this to a build section of the forum, ill prob. wait till it’s complete then tidy up...
Awesome idea.... look forward to pics. You should record all the armchair quarterback, crazy (and good) re-engineering ideas folk suggest you do to it while your there lol.Diesel Dave wrote:The new bike will be on display tomorrow as a work in progress a a local bike show..